Blog
Publish dacpac to fabric lakehouse using servicePrinciple authentication in Devops
Background
I have recently been struggling with an implementation where I had to setup an automated publish from devops to a fabric lakehouse and thought I might share this with other users that are facing the same challenge.
Remember to add you service principle with permission on the whole workspace, or preferable as a read only user on the lakehouse artifact, then add it to the db_owner role on the sql endpoint so that it is allowed to create all you database objects.
The use case I am having is creating shortcuts on the lakehouse, then expose parts of these shortcuts in regional views to the end users.
We've created different schemas for each region in the company Europe, Americas ands Apac.
Then created database roles and entra security groups to these roles so that the access rights are administrated in the AD rather than in the database.
This way no user has access to the raw table shortcuts in the lakehouse, only the views that might share only those comapanies within the users region.
Download SQL Database project
From an existing lakehous you have the possibility to download the visual studio project as a zip-file directly from the fabric user interface. This will give you a good start if you don’t have knowledge about how to set it up from scratch.
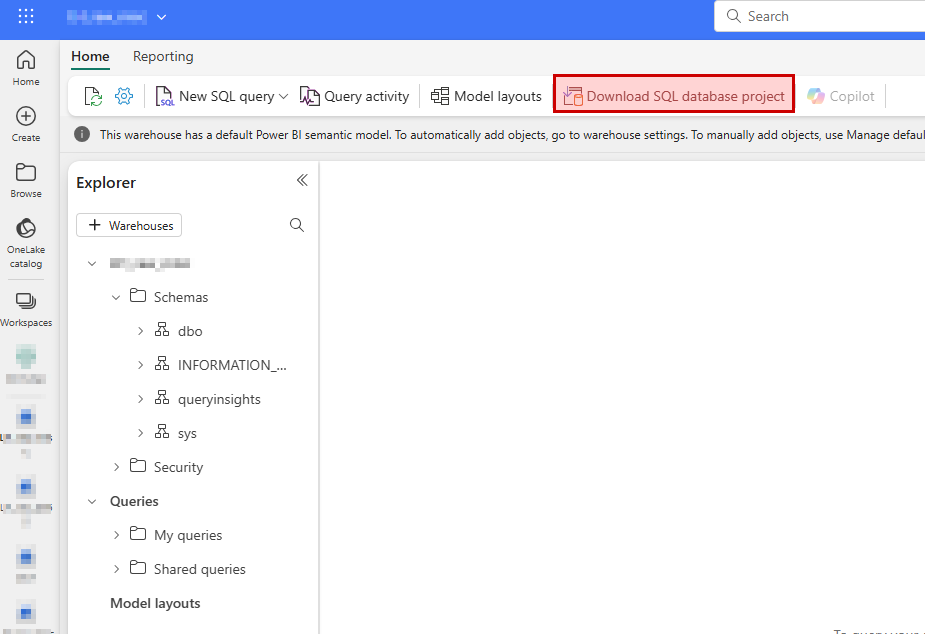
The project can be opened and edited in Visual Studio Code (download extension) or in Visual Studio Community/Pro/Enterprise if you like that better.
Devops repository
Create a new repository in devops where you commit/push the newly downloaded project.
I prefer to name all my sql database projects SQL_....
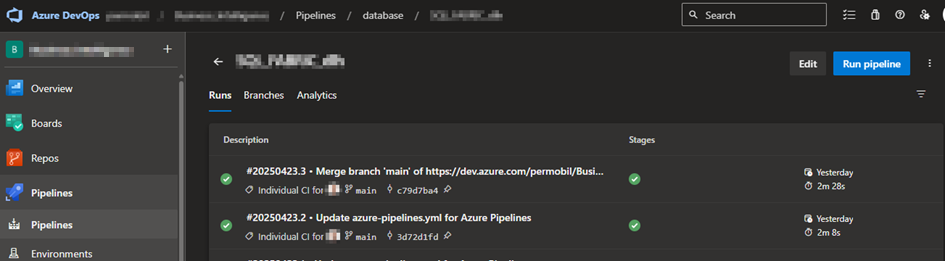
Devops build pipeline
Once the new repository has been created you will be able to setup a new build pipeline that is triggered automatically when new code is pushed to the repository.
Once you selected “New pipeline” you may choose “azure Repos Git” and point out your newly created repository.
In the next step choose “ASP.Net” so that you end up with a minimal list of tasks but having pool vmImage windows-latest and a build step.
You may remove the task “- task: VSTest@2” if you don’t plan to use it.
Also, add these tasks to prepare for the release pipeline later on:
    - task: CopyFiles@2
      inputs:
        Contents: '**'
        TargetFolder: '$(build.artifactstagingdirectory)'
    - task: PublishBuildArtifacts@1
      inputs:
        PathtoPublish: '$(Build.ArtifactStagingDirectory)'
        ArtifactName: 'drop'
        publishLocation: 'Container'
You may specify filters on the copy task if you have huge projects to speed things up. You will only need to copy the .dacpac file from the bin/release folder.
Once done, save and run will run the build pipeline for you.
Wait for it to complete, have a look at the log to make sure it doesn’t give you warnings and errors.
Also, make sure the copy task finds the dacpac file from you build.
If you push new code to the repo this build pipeline will automatically trigger.
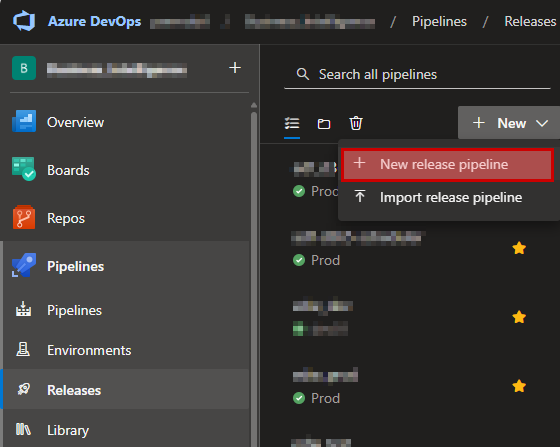
Devops release pipeline
Once the build pipeline is done, you’ll need to setup a release pipeline with potential multiple stages (dev, test, prod).
Select Pipelines – Releases and click “New release pipeline” in the dropdown list.
Then in the next step scroll down and select to the bottom where you’ll have the “Empty job”.
Give the stage a good name (dev for example).
Ion left hand side, click “add an artifact” and browse to your newly created build pipeline and press “add”.
Then in that same box in the upper right corner you can click on a lightning symbol where you can enable “continues deployment trigger”. This will start you release pipeline automatically for “dev” when the build completes.
Then on the right-hand side you can define jobs and task for this stage by clicking on the link symbol “1 job, 0 task”.
On the “Agent Job” right hand side you can click on the “+” sign to add tasks.
Search for dacpac and select Azure SQL Database.
The Azure SQL Database task needs to be configured correctly from top to bottom.
Use Azure Resource Manager and select a suitable service connection that you may already have created in the devops project settings.
When configuring the SQL Database, choose
- Authentication Type: Connection String
- Connection String:
Data Source=$(sql_endpoint); Initial Catalog=$(database);Authentication=Active Directory Service Principal;User Id=$(appId); Password=$(client-secret)
As you may see in the connection string there are references to variables here that also needs to be created where you add
- sql_endpoint
This is found in fabric by browsing to the lakehouse – View Details and then copy the SQL connection string.
- database
Add the name of your lakehouse in the variable.
- appId
Add the application id for you service principle found in azure app registration here.
- client-secret
Add the secret generated in Azure portal app registration for you app here.
What I had trouble with here was the the official docs regarding SQLPackage does not really cover that you are allowed to pass in appId and secret directly in you connection string.
It only covered that you can generate an access token using powershell and pass that on in the “Additional SQLPackage.exe arguments” using the variable /AccessToken:*****
I was spending a lot of time trying to implement this without much luck and was happy once I found that this step can be so much easier this way.
- Deploy type: SQL DACPAC File
- Action: Publish
- DACPAC File: browse to you dacpac file located on the drop folder
- Publish profile: not need, ignore
- Addition SQLPackage.exe Arguments: not need, ignore
Then go to variables – Pipeline variable and create the three variables sql_endpoin, database, appId, client-secret.
Remember clicking the “lock” symbol on the client-secret variable so that it won’t be available for anyone to fetch.
You may also (preferable) link your variables to a key-vault in azure, but that is not covered here.
Now save your release and start a new release based on this.
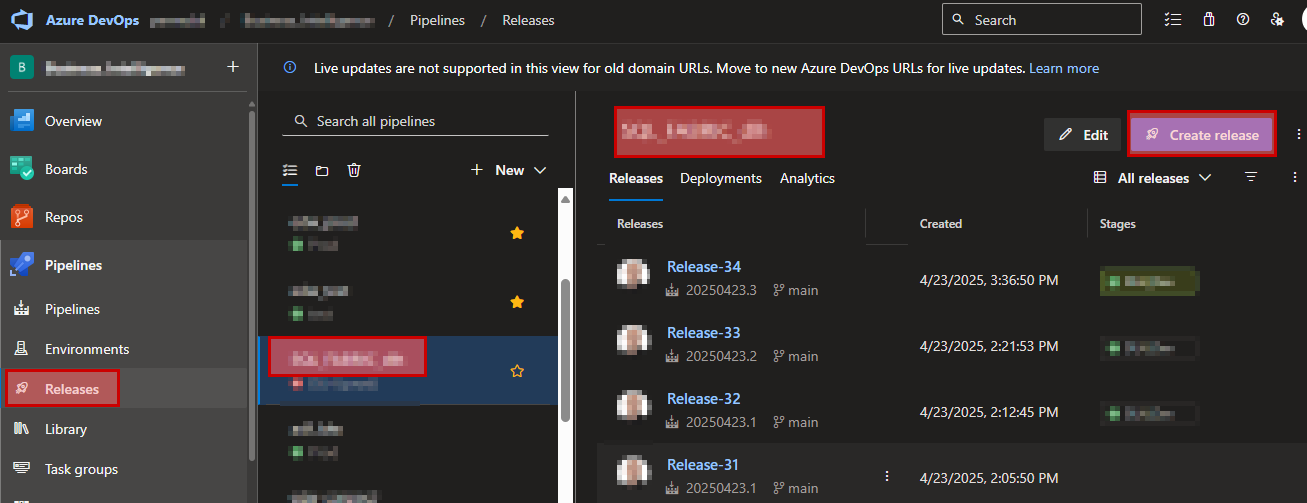
When the release pipeline has executed, carefully look at the logs to make sure it ran as expected.
Also check the end-result in your lakehouse so that all objects has been created.
Once you've got this running, you may setup more stages which allows you to publish that same database project to another lakehouse in a different workspace (test/uat/prod).
fabric, lakehouse, dacpac, publish, servicePrinciple, devops, CI/CD
- Träffar: 1436
New Heater control system based on electricity price
Okay let's get your updated on the latest solution.
Hardware
What I had before in terms of hardware (shelly uni) worked pretty good. Really nothing to complain about the solution, but I discovered how to enable MODBUS TCP in the heater and started looking into this more.
A few days later I was able to remove the external hardware I built controlling the heater and now running the control program completely from software using purely modbus communication.
The software communication is utilizing Home Assistant Modbus integration and only requiered me to figure out which address each parameter in the heater had. This was a pretty touch job.
Mainly what I did was
• installing CAS Modubus Scanner on my PC
• ran remote desktop from my Chrome-book to the PC with the modbus scanner
• and was then able to look at all modbus parameters live while comparing the numbers on the heater display. And then wrote down all the addresses I was interesting in.
Basically, below you'll see the sensors I was able to locate modbus addresses for
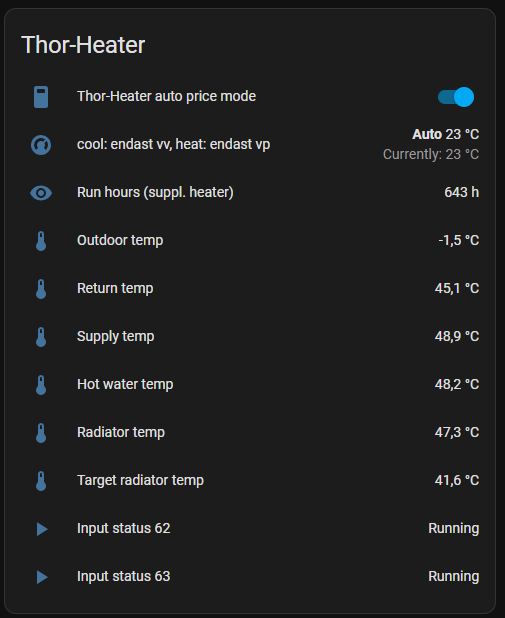
First line is an internal home-assistant switch which will allow me to disable/enable the control program if anything starts to malfunction. But the other signals are pulled directly from the heater.
The last two signals indicates if the heater is in running state or not. One of them could be removed, they are always showing the same state.
The signals are then pulled from Home Assistant into my node-red software using the Home-Assistant plugin for node-red. This is then where the logic is applied.
Control program
I have also added some more math into the control program to make it more dynamic.
There are a few questions that will need to be answered to make all the right decisions in the control program.
- What will be the out door temperature for the next hours?
I am currently using the SMHI web api to fetch this information.
- How many hours will my heater need to run based on the temperature forecast fetched above?
I use run history from my house to fetch this information. As seen in the graph the number of run hours on my heater is forming a pretty linear function.
Using what we learned in school back in the days about linear functions I was able to figure out a function describing the run hours based on the out-door temperature.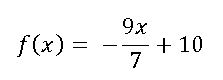
Now with knowledge about the required run hours on my heater each day I can schedule the downtime based on the coming price tops.
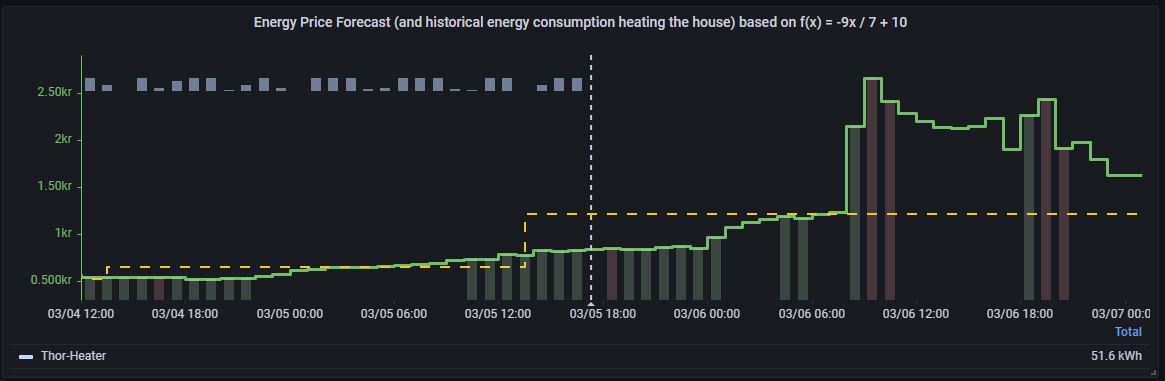
In the image above you'll see red bars indicating total downtime on the heater.
And as you may also see there are always one hour indicated with green color infront of each red bar. This will ask the heater to run the hour before the scheduled downtime ans avoid too low temperature in the radiator tanks.
The yellow line indicates the price limit that will need to be accepted this specific period to avoid the heater from getting less run hours than needed. So based on the out-door temperature the heater could be running all hours where price is less than the yellow line and then is not needed the other hours.
The problem with this is that the radiator tank cannot store this amount of heat and so will still require the heater to start during the time when price to above line.
What I did instead is that I scheduled the downtime around all the tops instead and have set limit on how many hours each downtime can go on in percentage of the total downtime. And from what I can see now the solution works well.
Only problem I sometimes can see is that when the temperature is very low (below -20C) the temperature in the garage is hard to maintain and I cannot afford scheduling any downtime at all without getting affected by low inside temperature.
When looking back at the history I can clearly see that the control program is doing what it is supposed to but I can also see that there is a very little earning that can be made on the heater because it cannot be scheduled on downtime for a very long time and only the biggest price tops during each days is what you can earn from.
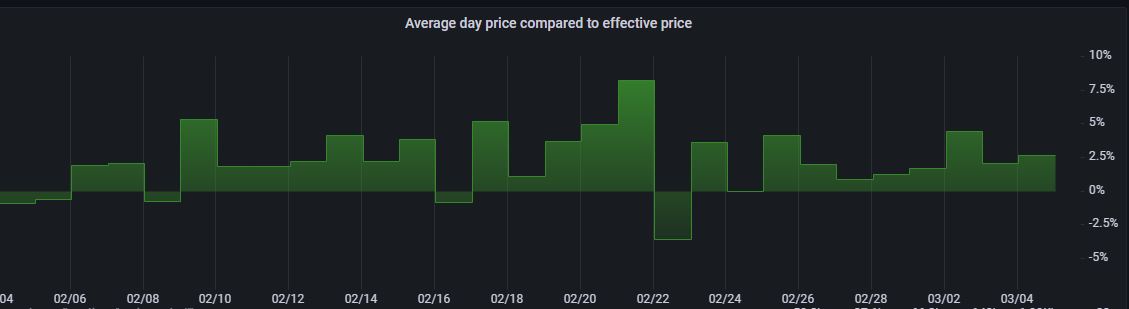
We can see that most of the days we have roughly 2-5% earning from the heater running this way. It's not very much but having a program doing this won't cost me anything more than the spent hours so far.
energiförbukning, elförbrukning, energipris, timmespris, smart-home, modbus
- Träffar: 1647
Accelev v2 Control program
Just recently completed the control program for the Accelev v2 2 phase EV charger.
The charger can transform 400V 2 phase down to 250V 1 phase which comes handy for cars that are equiped with only 1 phase on-board charger.
The technique utilized are an IoT platform running on a raspberry pi 4, running ubuntu 20.04 LTS.
Influxdb v2 as database, recording everything passing the mqtt broker on localhost.
Grafana for graphs.
Node-RED for flow control (this is currently where the program is running).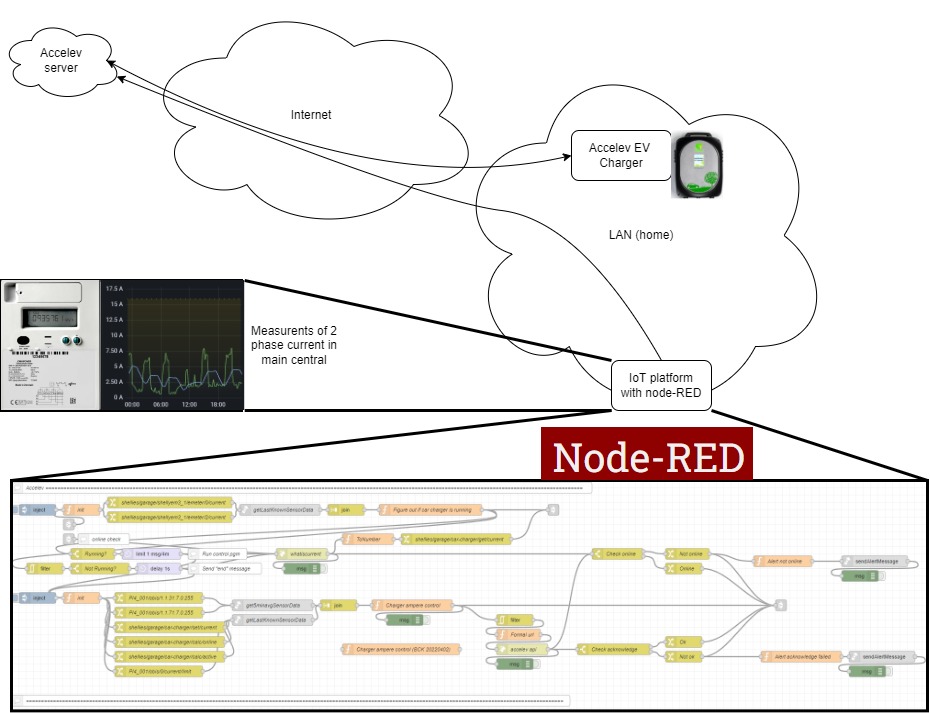
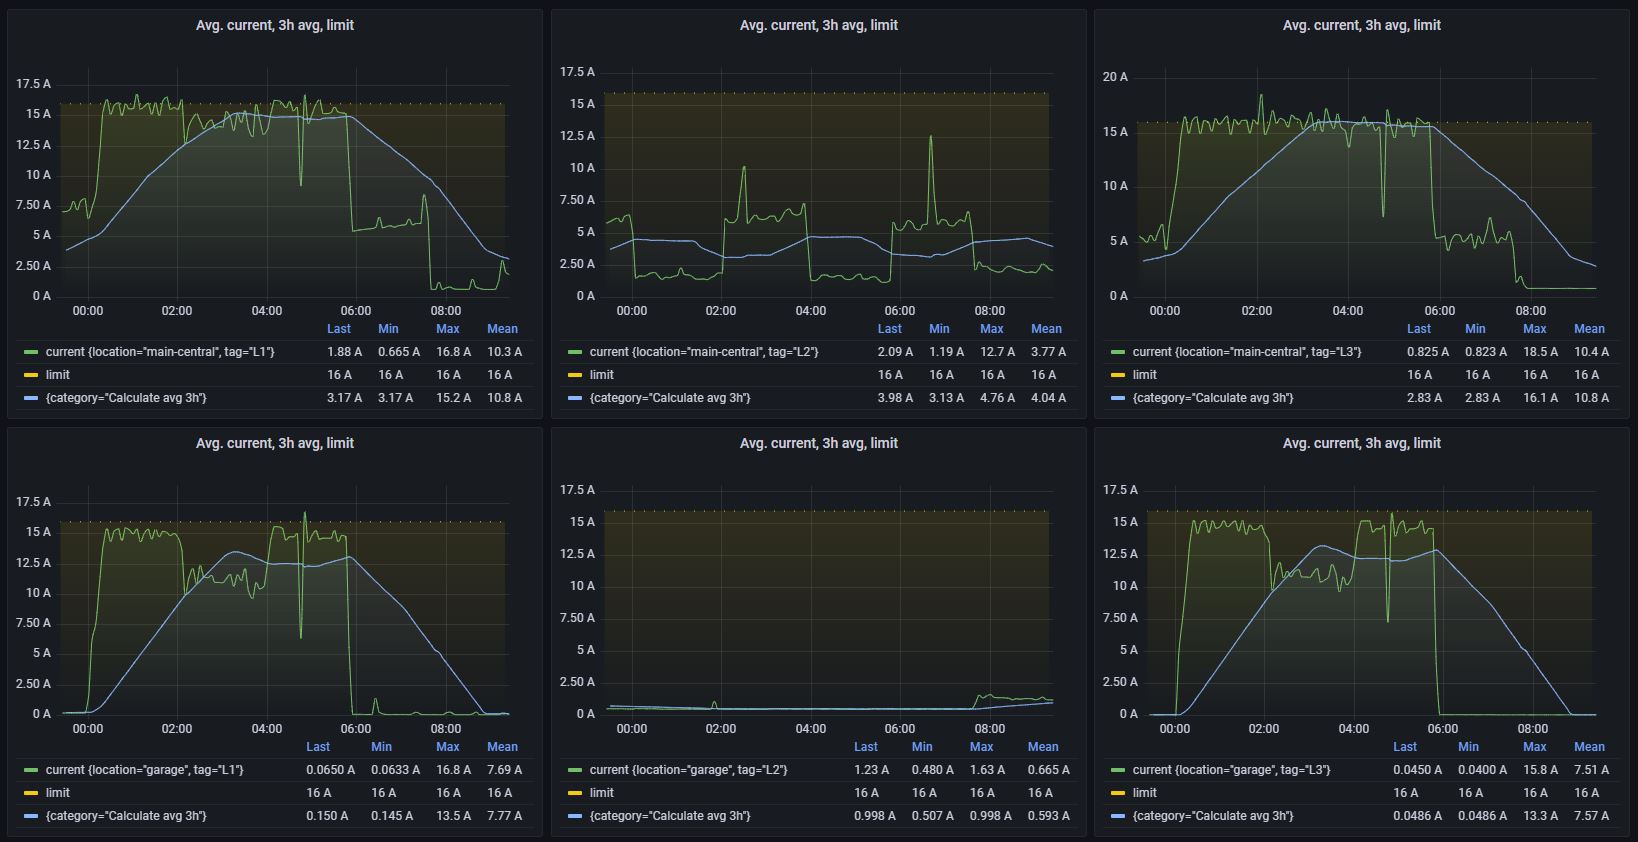
And as you can see in the image below, the current in main central i pretty close to the fuse limit throughout the charging time.
The three graphs in the top represents the current in the main central.
The three graphs in the bottom represents the current in the garage (where the charger is located).
The charger does not yet allow to communicate directly with the control program, it requiers connection with the server over internet and therefore won't work without internet connection.
From what I've heard, the vendor are working on implmentation of the apis directly in the local charger.
- Träffar: 2441